Canna growing guide
As the year progresses our Cannas are sold in various ways; January to April as freshly split rhizomes/started young plants or dormant established pots. May onwards as strong growing young plants, in some cases in various pot sizes priced accordingly.
JANUARY TO APRIL:
Many cannas are available as freshly split rhizomes which require immediate planting and care, a few varieties do not produce many or any saleable quality rhizomes and these are only available as plants later in the season. Rhizome production varies from one variety to the next and not all are worth disturbing during the dormant season in search of quality rhizomes as too much damage is done and lots of propagation material lost through breaking up clumps to find a nice rhizome.
Availability of established pots of rhizomes vary from season to season and are a good way to get a clump quickly established and especially recommended for those who do not want to grow on immediately but want to buy early as they do not need bringing on into growth as they can be safely stored frost free until growth starts naturally. Read on further for more details.....
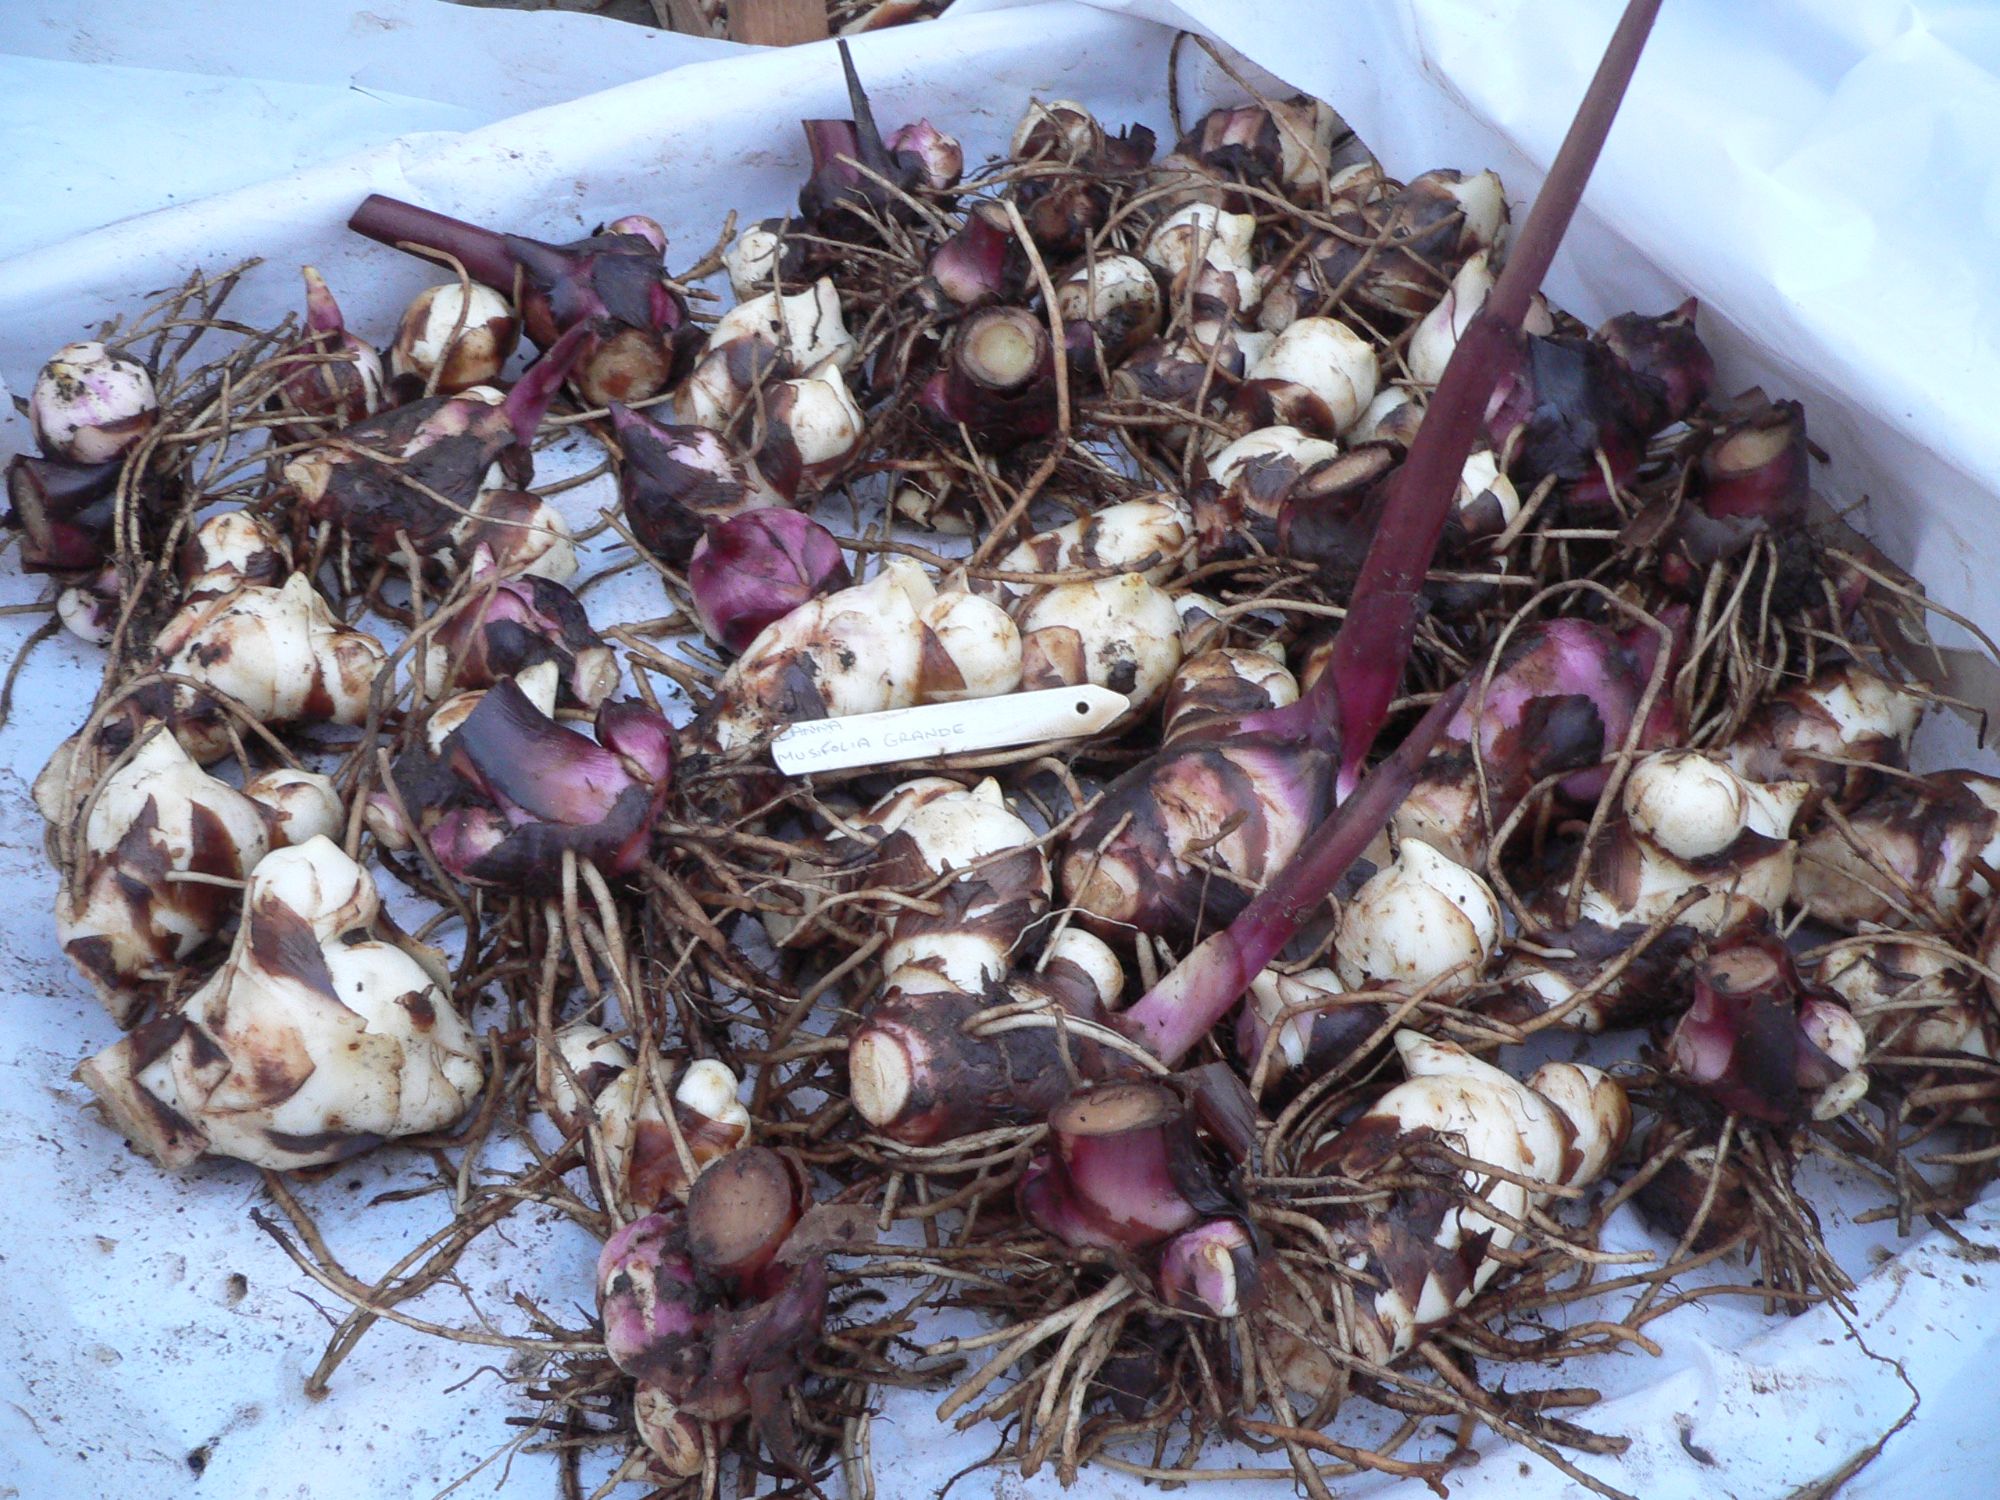
Growing from fresh rhizomes early in the season.
Early season rhizomes January-March will need to be grown on with warmth and light such as on a sunny window sill or in a heated propagator or in a warm room or the rhizome may rot due to the damage done when split from the parent clump. Initially light is not required until the shoot has grown 3-7cm tall. Getting the rhizome into growth early will result in a bigger plant during the growing season which can be very beneficial in the first season. Planted early in the season one rhizome would typically produce 5-8 stems by the seasons end and will flower in the first year (except musifolia). Canna musifolia bulks up faster than other types but is grown for its foliage and cannot be relied on to flower. Unpack your rhizome on receipt and pot on as soon as you can into a pot just large enough, with moist but not wet compost of a type for general use. Initially it doesn't matter what kind, be it bought/homemade or soil based or indeed garden soil. It should be easy to work out what way is up, the rhizome may be just buried or half buried as new roots will form from the underside. Your rhizome may be long like a piece of root with a bud at the end and possibly other developing buds further down if so plant horizontally partly or fully covered. If it is like a bulb I would plant it either just below the surface or with the growing point just protruding. Some other rhizomes may have a piece of old stalk at the top, this can be buried if not that long. In a damp environment the old stalk can develop fungus if protruding but this doesn't effect new growth, it looks unsightly though so best to wipe it it off with a tissue or put in a drier airy environment. Allow enough space for the growing tip to grow of the rhizome without touching the side of the pot. Adding fertilser at this time may be harmful but if the fertilser is already in the bought compost that's fine. When the rhizome is in growth and you can see some roots you can repot with a little fertiliser or manure added. Manure is most effective at the bottom of the pot. If started early season keep growing in a light and warm environment. If starting the plant in April or later a cool greenhouse is fine if kept frost free.
Buying established dormant pots:
These are not available across the range but for some varieties only and vary in quantity and variety from one season to the next. The advantage over freshly split rhizomes is established pots do not need to be brought into growth immediately, this is because the rhizomes have not been broken up, therefore haven't incurred potential damage. They can be stored frost free and allowed to come into growth naturally as the spring warms up. An established pot will produce a clump of plants quickly as there will be multiple shoots emerging from the rhizome or rhizomes in the pot. For guidance a 1 litre dormant pot would be potted on to a 3 litre pot and a 2 litre potfull moved on to a 5 litre pot, a few weeks after new growth has become firmly established. On receipt unpack and store frost free. Keep the pot moist, water if it is dry on receipt, obviously a warmer position will get growth going faster (forcing) or put in a cool frost free glasshouse, the plants will start growing when ready, relevent to the conditions provided. Or force into growth as per freshly split rhizomes. Naturally, all pots are checked for vigour before dispatch meaning we know they are very much alive when sent out to you. Some pots are distorted by the amount or size of the rhizomes within. To remove the contents of a distorted plastic pot we suggest cutting the pot apart with secauters.
Early plants, bare rooted or potted;
If you have early plants they need growing on in a warm and light environment as if they stay standing in a cold yet frost free environment growth may stall severely affecting the vigour of the plant. Bare rooted plants need unpacking on arrival and either pot straight away or bury base of plant in some compost and keep moist and warm until potting. Water carefully initally as when freshly planted they are delicate until roots strongly established. Early season potted plants up to end of May also need a bit of care and grown on in a protected environment until all danger of frosts has passed.
EMERGING LEAF DEFECTS and stress symptoms in young plants.
Early propagated plants such as those from a propagator will likely have odd coloured patches and a little damage to the leaves, this is perfectly normal on bare rooted and just potted plants forced into early growth and is too be expected. This is largely due to vast ranges in temperature and sunlight strength during the early growing period and the high humidty in the propagator. Importantly, once in settled conditions, new leaves take on the desired appearance. Following rhizomes, the earliest plants are bare rooted. Early potted plants are started into growth in a propagator and then grown on, then sent out. These need sheltered warm growing conditions until all risks of frost has passed.
Sometimes the first leaf of the season may have some brown or transparent patches. The second leaf may also have issues with its appearance on a much lesser scale. This issue, when it occurs, grows out quickly. Also the young leaves are vunerable to scorch and burn from being on the windowsill/ underglass or a hot dry environment, direct very strong sunlight can quickly cause discoloured patches. When the plant has a few leaves these early ones, if too unsightly, can be removed.
The first leaf or two especially grown undercover can have many kinds of imperfections including marks & spots. Canna Black Knight is susceptible to a patch of spots on a leaf or two on young propagated plants/stressed young plants such as stress having been just propagated or heat or drought which does not reoccurr when established. The key point to realise is that one unsightly leaf today will become insignificant quite quickly due to the fast growth of these plants. There is much paranoia about Canna virus and it should be a concern to a point. There is more about canna virus further down this article.
GROWING ON/PLANTING OUT
Canna are clump forming and will produce multiple stems from soil level throughout the growing season. If planting large varieties to make a large group plant about 50cm apart. Once your plant is growing strongly you can feed regularly or pot on with manure or both. Canna are very greedy plants and once growing strongly cannot be overfed or over watered but this doesn't mean keep the pot standing in water as it is best to be able to drain to avoid stagnation of the soil. In the early stages you need to take care but they are easy plants to grow. There is no point planting out too early and the warmer they are kept in the spring the faster they will grow. I aim to plant out here at the end of May but it's often mid June by the time all the planting is done. The foliage on young plants will be easily killed or badly damaged by late spring frost. Plants can grow strongly in a small pot and they will distort a plastic one if not potted on. Warmth, food and water are the key to large plants. If keeping in pots best results will be obtained in a pot size of at least 30 litres for the final container for all the large types. I grow in the ground, raised beds and in pots. Potted specimens are great for moving around and providing interest/ adding drama in dull areas throughout the season. Lots of manure used for all the cannas. Unusually, you can use fresh horse manure for growing cannas and that is what I use as it is cheap and easy to get hold of.
Plant in full sun or dappled shade. Flowering is affected in full shade unless growing very vigorously. For foliage they can be grown in shade but as mentioned they thrive on warmth. It is said that darker foliage types loose leaf colour in full sun and it may be so but not by a huge amount. Flowers can fade in strong sunshine. Canna do not do well in a windy location as the leaves shred and look tatty.
SUMMER CARE
Planted with manure around 50/50 in pots I still feed with vitax Q4 every six weeks or so. This much manure will last the plants at least a couple of years. Those in the ground like plenty of manure added around and in the planting hole. Water frequently for best growth however they are drought tolerant. When anticipating flowers, as a general rule after seven leaves on a stem a flower spike should be visible. Dead heading can be done by shaking the flower stem if they are too tall to pick off. The flowering stem normally branches to produce more flowers so avoid dead heading by cutting down the stem. When the stem has absolutely finished flowering I cut it off above the top leaf, as I grow for foliage as well as flowers. Flowering can go on into early November here. In a sunny conservatory the plants will keep growing and not die off.
AUTUMN/WINTER
Some people are lucky enough to be able to overwinter their cannas without bringing them in, in certain coastal locations, but my advice is to cut down the stems to the ground after the first frost blackens the leaves and dig them up and keep them as intact as possible leaving the soil on and storing frost free and damp. Light is not required through the winter until the rhizomes start into growth with new emerging shoots in the spring. When I dig up the canna, it is put on a polythene sheet which I wrap around the soil to help keep it moist for longer. If in pots bring in and store the same or dig out the plants from pots too large to move. Dig out trying to keep the clumps as intact as possible and again store the same. Provide light and warmth to bring them into growth in the spring, which is the best time to divide them.
In very mild areas you will find some cannas are much hardier than others for example musifolia/russian red are among the toughest coping with pots covered and left outside in -5c. Black Knight/ Durban are among the more delicate. Levels of frost vary, a more penetrating wind frost is able to cause more damage. A deep mulch and plastic sheeting can help. Deep snow before the frost gets severe is helpful too. For pots try and store out of the chilled winds and wrap the pots in polythene or pond liner. In Winter 2021 Cannas in the ground were left until 04/05 January 2022, before being lifted with dispatch of rhizomes commencing the following week. I like to leave the cannas in the ground for as long as possible as when dug up some damage can occur which leads to rotting. The shorter the amount of time in storage the better with rotting after lifting damage usuallybeing a slow process. Canna left outside are slow into growth initially due to the cooler temperatures experienced compared to those brought in. They catch up eventually but in all situations you will get a longer season from those brought in and grown in the greenhouse during the spring.
PROBLEMS AND PESTS
Canna are pretty robust, tough, plants with few issues.
Cannas often distort plastic pots and can be difficult to remove. The pot can be cut up with secatuers or if the plant is mature and strong and the pot larger the pot can be dropped on a hard surface, usually from waist height is enough, and the pot will break sufficently to extracate the plant. This method is not recommended for plants with weak or long growth as the stem may snap but is perfectly good on strong plants which they are likely to be if distorting the pot.
The most common problem I hear about is canna's not flowering. This is almost always due to insufficent feeding of the plants, generally in pots. The large varieties need a minimum 30L pot. Medium sized varieties can be grown in pots half this size but generally use the largest pots you can manage for the best displays.
Pest issues I have experienced are with aphids in the early part of the season but never to serious levels. Spider mite are often a problem especially under glass/polythene and in our warming climate these pests can be an issue in the garden. I always use the recommended biological control and never pesticides. Sometimes caterpillars cause minor damage and snails cause multiple holes to appear on unfolding new leaves.
CANNA VIRUS is still is a major problem especially affecting dry rhizomes supplied by bulb traders/garden centres and growers who produce plants for sale from them. It's best to avoid buying the dry rhizomes/bulbs, although some people must have had success with them. Canna virus is spread by aphids or cross contamination with infected material during propagation. By and large it is not something which turns up out of nowhere or airborn, there will be another explanation. I sought to increase my range in 2021 and bought in a few plants in order to achieve this and it quickly materialised that there are lots of virus infected plants offered for sale out there including from some surprisingingly well reknowned outlets. Some plant sellers especially general nurseries will pot on their unsold dry canna rhizomes and sell virus infested plants. There are a lot of unscrupulous sellers out there and many opportunities to pick up canna virus so it is really worth buying from a trusted source. Of which, in my endeavours to acquire new varieties for my own collection, I have discovered there are very few. And being careless can lead to some or all of your cannas becoming infected. All my canna are grown from scratch on site and are healthy , free from virus. It is easy to be very concerned that a new plant might have the virus. Signs of virus vary but the most common and worst one shows yellow striping in the leaf veins at an early stage and or widespread yellow spotting. (Yellow spots in just an area of the leaf are normally down to previous or current aphid/spider mite damage and the spots look different.) Later the plant may distort, flowers distort, leaves rot, plant rots. The key is really the yellow striping/spots in the veins throughout the leaf and can be difficult to detect in the variegated cannas but mottling, yellowing, distortion are all possible later signs, browning and rotting during the growing season can be signs of some of the devasting virus taking hold, this would be after the yellow stages described otherwise the browning or distortion are likely to be other issues like waterlogging in oxygen starved substrate. An extreme example of this would be growing in a bucket of mud with no drainage holes exposed to the heat of the sun. Suspect plants should be isolated or destroyed. That said if plants are grown stressed they may show some erratic leaf growth through rapid temperature fluctuations and yellow patches can be down to a patch of chalk in the soil or some other soil contaminent and things like that. Also, rarely, a broad paler stripe down the length of a leaf can occur especially after some fast growth and some some strong sunlight. Pale dots in areas of leaf, but not over the entire leaf, can be after or during pests such as aphids and spider mite. Browning or crisping of the leaf edge can be down to wind burn or sunburn in low humidity conditions. When I get a new variety I get as few as possible and monitor closely. Even then I have burnt a couple on unpacking that may have been virus free and burnt others that certainly had virus. Any new plant coming in is grown in isolation and checked for aphids regularly so as not to spread the virus to my other plants and monitored closely for the first year. Check out the dedicated page for canna virus and common leaf damage symptoms. Suspect plants can be isolated/observed/burnt.